Sunday, December 25, 2011
Sunday, December 18, 2011
Saturday, December 17, 2011

Sunday, December 11, 2011

Saturday, December 10, 2011
Wednesday, December 07, 2011
Sunday, November 27, 2011
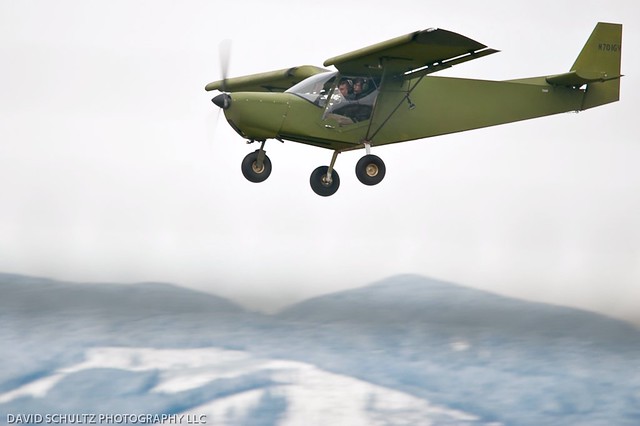
Vashon Municipal Airport
Sunday, November 13, 2011
Flew off the remaining 1.9 hours of Phase 1 testing on Saturday, staying close to AWO due to weather. Performed and oil change with a new filter and did an engine inspection. Found that the radiator was rubbing the cowling a bit, so I installed some corking. Removed the NACA vent to the oil cooler and aluminum taped off the cooler to help with low oil temps. Also taped off part of the radiator to help with low CHTs.
Tried out the new "16" grass runway. Winds were 120@8kts to 120@10kts. Also finally tried the plane in the rain. All performed as expected.
Monday, November 07, 2011
PIREP: Grass
After much discussion I decided not to use a full stick back technique for takeoff, nor pulling the stick full after after landing due to possibility of over rotation. Flaps were not used as they cause a “heavy” elevator, greatly increase sink rate and increase the pressure on the nose wheel.
I started with about 10 takeoffs and landings on the pavement to warm up and practice softfield technique. Then I transitioned to about a half dozen takeoffs on the grass with landings on the pavement, then finally approached the grass.
The first several landings were T&Gs so I could get a feel for the surface without committing the full weight of the aircraft to the strip. It also gave me a good initial idea of how much strip I would require. The current grass strip at AWO is 1500 feet. After 4 T&Gs I brought the plane to a full stop and taxied back by the pavement, then progressed to stop & gos. Overall I did 30 landings on Saturday
I found that with no wind on slightly wet grass I currently need about 500 feet from touchdown to get to a full stop solo. Takeoff run from a stop appears to be about 300 feet. Overall I prefer pavement takeoffs due to the 50% less space required. They are faster and just more fun.
After almost 40 hours in my 701 I think landing it on the grass is preferable despite the increased roll distance. The impact is softer and the slipperiness of the surface makes it feel more forgiving. The nose bounces a bit due to the bungee cord without a shock\dampener, but prop clearance did not look to be an issue and you do not feel it in the cockpit, although the video makes it look like I was tossed around.
After a few hours of landings at AWO I ventured south, when down the valley then across Bellevue to BFI for some pattern work. Like with the 150 I requested early bases and added early cross winds. By altitude the crosswinds were not early, but given where I was I still made sure they were OK. Once again the BFI guys are the friendliest ATCs around and even recognized my voice and commented on the plane’s performance.
In addition I tried a David Clark ENC headset. What a world of difference. This is the first active headset I have tried that does not produce an uncomfortable pressure on my ears. It also does not produce an irritating humming sound when on. The active “reduction” is very noticeable and allows me to hear myself without turning on the intercom while on takeoff.
Combined on Saturday I got 4.1 hours in.
The current grass runway at KAWO is on the West side of the hold short line, just north of the skirt and south of the A2 taxiway. There is a new grass runway that will be officially opened soon.
Saturday’s Video:
Sunday I played on the grass more and then ventured out. I ended up at JeffCo to have lunch where I just missed another 701 builder. Then it was out towards Sequim until clouds stopped me, up over Whidbey with a transition, then over Cypress to Bellingham, to Skagit and finally back to AWO.
The video does not really show it well, but saplings really do cover the old Cypress strip. The catch them on film them I would have to get much closer than I was.
Sunday was 3.4 hours in the air. That leaves 1.9 hours left of the 40 hour test period.
Sunday's Video:
Sunday Cypress Island Fly Over:
Monday, October 17, 2011
Sunday, October 16, 2011
Tuesday, October 04, 2011
My normal routine for testing out a change like this is to follow the valley and fields Northwest from AWO towards Stanwood and then try turns, stalls, ect at high altitude then return back to AWO to try landings and then more landings to make sure I like the change.
After about 54 minutes of trying out the VGs I hit a problem.
Halfway through a downwind leg at cruise power\attitude I hit an unexpected loss of power.
The engine became rough and power dropped down to an almost stopped state, then came back up gradually, went back down gradually a few seconds later, came back up gradually a few seconds later, went back down, came back up. The loss of power lasted about 45 seconds to a minute. Carb ice crossed my mind while doing the landing. It was similar to the symptoms of carb ice in an O-200, but my installation has constant carb-heat.
At the first sign of the drop I had already started pitching for glide and called out the mayday. There were two planes on final and one on base. The two on final went around, but the pilot in the tow-plane still turned final and did not abort, turn or otherwise react. Several other people on the radio chimed in in an effort to get him to react.
With the 701 I fly my downwind and base no more than ¼ mile out. I turned base just a little North of the numbers and landed the numbers with better than idle power.
Sadly the on board camera had run out of battery and 1) did not catch the engine event 2) did not catch the emergency landing with a HAPL approach that I hope would have made my flight adviser proud.
Up to that point I had put on 2.5 hours alone that day. There was plenty of fuel and I was hallway finished with my downwind at cruise power, so even a failed fuel pump should have not caused this.
After landing I did do a full run up, and everything was fine. It made full power, mags grounded, ect.
The loss-of-power event was caused by a clog that collected in the fuel filter. My morning preflight showed no issues at the gascolator or in the fuel filter. My theory is that debris that had not been swished out of the tanks, along with debris introduced by auto-fuel and some small amounts of sealant collected in the gascolator on the forward edge. Earlier in the morning I performed a test were I wanted to see how far I could taxi with the fuel valve shutoff ( this was due to several accidents this year were some Cessnas had enough fuel to start takeoff with the valve shutoff ). The intentional fuel starvation most likely caused suction in the fuel lines causing the clog to dislodge and move up the fuel line to the filter.
As a result I will be cleaning the filter and gascolator every 20 hours or so.
Video of a short landing:
Video of flap testing\very consistent landings:
Sunday, September 25, 2011
The friction in the rudder pedal bearings was also reduced by changing the bolt tension down a bit to 25lbs from 30lbs.
In flight the rudder slowly returns to position, but is still not as loose as I would like due to the nature of the nose bearing surfaces.
A new lower nylon bearing had been fabricated and installed last week. The old bearing had shown some signs of wear and had a 2-3mm gap in it. This new bearing was intended to reduce the amount of forward and back shake on landing. Overall the change was successful. The shake is still visible, but it is no longer detectable in the pedals. This may be the nose strut flexing.
I ended up making a side-by-side comparision video of my 701 & 150 taking off and landing. The takeoffs are on the same runway and almost identical conditions. The winds, pilot, amount of fuel, ect were almost the same. What was not the same was how I flew the 701. This was a normal takeoff, not a short field takeoff. For the 150 I did a short takeoff.
The landings were similar in wind. Obviously the runways were different. The 150 land land short. Just drop 40 degrees of flaps and use power to keep from falling out of the sky.
Sunday, September 18, 2011
For the shake I fabricated a new lower nylon bearing. This one has a tighter fit than the original, so the forward\back motion is limited.
To install it the old lower bushing had to be removed. This was an incredible pain. Reaching the bolts is complicated by the nose strut and the muffler. While the nose bearing was out I removed the v-notch channels and machined them down to create a smoother ride. the new shape is a semi-circle instead of t notch.
I also experimented with the strut cap. New pieces were fabricated out of nylon and phenolic to attempt to reduce the nose gear friction. Once all the pieces were re-installed some reduction of friction was made, but not much. In addition new friction was added by the new lower bearing. The lower nose gear needs to be removed again as I found the new machining of the notches allows for full left rudder deflection, but not full right deflection.
There is still too much friction in the rudder system. After much experimentation I can say the friction is mostly from the nose strut. The rudder by itself is free of perceivable friction. Some friction is being added by the rudder pedal assembly bearings. Grease, teflon, lithium, ect does not seem to reduce the pedal friction.
With the nose gear push rods removed, it obvious that the nose gear is the cause of my troubles. By placing washers under the nose strut cap, I tried lowering the nose strut to allow the cross tube to rub the newly machines angle. This was more friction than the strut cap, despite having less contact surface. The addition of a nylon or phenolic piece under the strut cap adds some reduction in friction, but not as much as expected. One idea I have is to place a matching nylon piece on the firewall shelf so the bearing is nylon to nylon. This would require removing\accessing the bolts holding the upper nylon bearing and may be impossible with the nose strut in place.
The final attempt will be to perform the roller bearing mod. Adding the bearings will require removal of the nose strut or the exhaust system. It will also require some way of adding additional material on top of the lower nylon bearing to allow for full deflections.
The roller bearing mod was originally found here: http://www.utdallas.edu/~klaus/Airplane/nose_gear_thrust_bearing.html
The proper bolt length appears to be AN3-37 and the bearings are "DPP4-FS464" from ACS.
Monday, September 12, 2011
Handling at rear CG was slightly lighter. Power-off and powered stall attempts, takeoffs and landings were about the same as solo/no gear.
Next I added 200lbs of sand bags and fueled up to 16 gallons. Starting DA was 2000'. This was also the most forward CG I could obtain according to the numbers.
Takeoff roll was about 300' and climb out was ~700~750FPM. Power-off stall attempts resulted in a lower nose attitude when the elevator lost authority. Poweron stall attempts also resulted in a lower nose attitude.
Landings were very different. The added mass gave the plane much more momentum and was harder to slow. With my standard final approach speed of 60 MPH, the sink rate was higher and the plane felt "faster".
On Sunday I found an issue with the control system. The baggage area was loaded, but in a slightly different way. This caused the piece of nylon I installed underneath the baggage area to shift. The end result was a snag that I felt in the controls check. It took about 30 minutes to locate it and then a few more minutes to fix it.
Tuesday, September 06, 2011
Lots of flying over the Labor Day weekend. The big item was getting N701GV up to 17990 and running out of VFR airspace. The climb took 38 minutes and 100+ FPM of climb was still left at 50MPH indicated.
Parts were ordered for the roller-bearing mod on the nose gear. This should improve the feel of the rudders in the air. I will also adjust the lower strut bearing to see if it can be tightened and remove the V-notches the nose strut sits on.
Thursday, September 01, 2011
Reached 10 hours in the air. Changed the oil and did another under the cowl inspection.
All indications from the magnet filter and oil look good, break in is going well.
Found some evidence of an oil cooler fitter rubbing against the engine mount. This was more flex than expected. The filter was moved and secured down additionally to stop this.
After adjusting the turnbuckles more, it appears that 18lbs tension is the magic number. The slight left turning bias on the ground was traced back to a trailing \ not yet broken in brake pad.
There is still more friction that I would like in the rudder system, so I will install the rolling bearing mod on the nose strut.
The airframe now has about eleven hours in the air.
Thursday, August 25, 2011
Monday, August 22, 2011
Monday, August 15, 2011

The weather has not been very cooperative for test flying recently. Taking advantage of this down time I opened all the inspection ports and did a full day inspection on the plane.
Additional grease was required and I vacuumed out more chaff that has appeared. More grease was required in the inspection bays around the controls and bearings. Some additional grease was required between the nose strut and the accessory shelf.
In addition I added velcro fasteners to all the seating and installed a document holder.
Sunday, August 07, 2011

I added another 1.6 hours today in the air.
Several tests were done. First was a temperature measurement of the avionics area during taxi, pre-flight and in flight. Next was a test of flap deployment and retraction. finally I measured time-to=climb and have first numbers for Vy.
The ambient temp was 82F during the test flight. During run-up and taxi the area near the Dynon reached upto 95F. Opening the air hatches reduced this closer to 91F. I may need to install a fan tied to the master bus in the area of the Dynon.
Climbing out to 4000 I explored slow flight some more. The force it takes to deploy the flaps above 60MPH is very high. Realistically you need to be lower than 55MPH, or even 50MPH. I found the flap deployment produced a strong nose down attitude, but ample authority was available in the elevators and ailerons.
With the flaps deployed I attempted slow flight at 40MPH. I may attempt slower flight later. An attempt was made to stall the plane with the flaps deployed, but once again the elevator does not have the authority to produce a high enough attitude to stall the plane.
The transponder was re-verified and flight-following was used during most of the test-flight.
Additionally I reversed the bend of the trailing edge to the elevator. Currently the bend is now about neutral. This helped reduce the amount of nose up trim required for cruise flight. I suspect reflexing the flaps slightly will be the final solution to not requiring too much nose up trim in cruise flight.
The rear locking pin on the pilot side works well, although the door is slightly harder to close.
I did several measurements for Vy. The initial winner for a 4000-5000' climb is 45MPH. The time for 45MPH was several seconds faster than 50MPH. I did attempt 40MPH and 35MPH. The nose attitude of 35MPH is amazing. The ground reference plane of the Dynon just goes out of view. The other runs were made at 70, 65, 60 and 55 MPH.
After landing I did find a small drip was coming from a fuel sampler fitting. After cleaning the area with a cloth and examining it, it looks like the drip is coming from the sampler's hole. I checked the tightness of the fitting and it is secure. Furthermore I pulled on the fitting to make sure that it was fully down and not stuck slightly up. I may need to drain the tank and replace the fitting.
The plane now has 5 hours in the air and 4 flights\takeoffs\landings.
According to the indicated fuel levels, 5 gallons were used in the 1.6 hours of flight. Fuel burn was at 3.1 gallons an hour.
Saturday, August 06, 2011
The area above AWO started getting bumpy beneath the 4000' scattered layer over AWO, so I took the plane out of the pattern. There is a nice stretch of pasture the runs NW from the airport to the shore.
I ended up climbing all the way to 6k indicated and the plane still had plenty of power, refreshing compared to a 150\O-200.
While up there I did several things. First I contacted Whidbey approach and verified they could pick up the transponder. At first they were just picking up the discrete code. It took me a while to realize that the transponder was on, but not on ALT.
While climbing I played with my airspeed to at least partially verify Vy. Without doing a specific, A\B test, it looks like 55MPH indicated is the answer.
I also explored slow flights and attempted power off stalls. I took the plane all the way down to 40MPH and the plane exhibited good control characteristics. Even with low power settings substantial right rudder was required with the nose high attitude.
Power off stalls were approached with caution. In the end the elevator ( as often reported ) does not have enough authority to stall the plane. The altimeter unwinds ( but not too fast ) and you still have authority in the ailerons and rudder.
I also attempted to pull some Gs and perform tight turns. I was able to turn inside my wake, not hitting it until I straightened out to reverse the turn. Forty-five degrees was as far as I was willing to take it. Even then it was hard to pull more than a G or two, the plane is just that maneuverable.
Enough grease and lube has been added that the rudder now straightens itself out gradually. As the nylon block wears in the rudder should loosen even more.
Part of the testing was fuel usage measurements. The plane started with 10 gallons. After 1.4 on the hobbs the final indicated fuel amount was 5.5 gallons. Power was well below cruise for most of the flight, so 3.5\hour for cruise should be reasonable with 11.5deg pitch.
Today's landing was the best yet. I kept more power into the landing than before and made a good effort not to flare until last minute. Keeping the power up and settling on long final with a slightly nose high attitude ( like a seaplane ) really added a lot of stability to the approach. The improved rudder lubrication also showed through.
The 701 really rides thermals and updrafts. The low wing loading combined with short wings also gives the ride a unique feel. You hear some metal rattle a split second before you get tossed up in the sky. Crossing through a disturbance on one side of the plane produces what I can only describe as a "burble"... like crossing a power boat's wake in a canoe.
The next several flights will be taking the turns tighter, hitting VNE and then adding simulated passenger weight.
After the flight I ended up installing a rear locking pin on the pilot side.
Tuesday, July 26, 2011
Sunday, July 24, 2011
The good news is that the door pin on the passenger side worked. I noticed some puckering on the pilot side today, so I will repeat the mod on the other side.
The efforts to reduce the rudder stiffness worked.
Today was a hot day which mad me think about cooling: specifically of the Dynon. The Dynon does not have any fans. After the flight it was hot near the Dynon. I am thinking a NACA style duct may be a good idea to promote cooling of the electronics.
The flight was a basic repeat of the first flight, with the exception of attempting slower flight. I took the plane down to ~50MPH and experienced the same shudder\bobble that I felt in the plane I transition trained in.
When I took off, winds were calm and mostly down the runway. When I landed I had a good cross wind.
During the landing the plane certainly seems to want to shuttle cock into the wind. That or there is a left yaw tendency. I checked the rudder alignment and it appears fine. If the third flight exhibits the same behavior then I will adjust the dorsal fin.
This landing was another firm landing due to flaring too high. I have also noticed that adding power to attempt to slow the settling will result in a ballooning. Adding power just makes the plane climb.
Saturday, July 23, 2011
 Frabricated a securing mechanism for the passenger side door.
The fix is basically a thick piece of angle riveted to the top side of the factory supplied handle. I then drilled a hole in the free side of the handle and bolted a rod-end there.
The rod end was connected to all thread. I then riveted a piece of tubing onto the door for the all-thread to be retained by. Finally I drilled a hole large enough for the all-thread into the fuselage.
I also spent a large amount of time chasing down friction in the rudder system. The biggest offender was a huge spot I had not greased - the nose strut stop plate! I ended up just giving everything more doses of grease, even the nylon fairings. With the tail tied down I was able to reduce the friction by an order of magnitude.
By the time I was finished with all the other work today the winds had picked up past my threshold. I did a taxi test and a run-up. The door held without any pucker on the ground where it had previously puckered some during run-up.
Taxi tests with the newly loosened steering system were highly encouraging. Friction for ground handling has been reduced to at least a quarter compared to the first flight.
Thursday, July 21, 2011
 In retrospect the post I wrote Wednesday night\Thursday morning was a ry, technical report written in exhaustion and under the influence of a few celebratory drinks.
It is probably time to fill in the rest of the story.
There was of course a large amount of initial nervousness on my part, let alone my wife. Vivian only had gave me conditional permission to execute the first flight if Tom was there flying chase. In turn Tom made me promise not to mar his perfect history of first flights without an incidents.
The real pre-flight inspection was done on the 19th to make sure nothing was missed due to nervousness. I had practiced some of the first flight in the 150 on Sunday with Tom riding as an instructor. We also practiced HAPL.
On the 19th after the DAR visit, my own inspection and putting all the hatches back together I wanted to do a run up. This way I knew I would have enough battery to start for the first flight and maybe catch a few issues. The weather was extremely good and the airport was empty so I did some taxi testing on 34. The first pass was just to see how far I had to go for the airspeed indicator to come alive. Then I went as far as to rotate the nose. At this point the rudder still did not seem THAT stiff.
Flash forward to the 20th. I flew up to AWO from BFI for the test flight. Flying immediately before hand was probably the most calming thing I could have done. It got me in a flying mind set and also let me know the real conditions aloft. There was no guessing if the air was smooth or not.
Going over emergency procedures, bailout procedures, ect was a little stressful. The idea that that I may have to trust a parachute packed by someone else just seemed wrong. If my day was going that bad, then how much worse could it get, right?
We removed everything from the plane and vacuumed it out once more. Only stuff riveted, bolted or screwed down remained except for the bottom section of my seat cushion. I only had a three printed pages ( two pages of checklists\procedures and the test card ) and a voice recorder taped down and jacked into the intercom. The tape of course ran out during the flight.
The run up seemed to take forever. And it really did. You can’t fly the Rotax until the oil gets to 120F. That meant some idling to get the engine warm enough.
For this flight there was a clear division of labor. Tom was going to handle the radios from the Cessna. I just needed to stay on frequency to communicate with him. He was to keep traffic clear and advised.
With the run up done and the pattern clear there was nothing left to do but to just get the flight over with. This was the peak of my nervousness.
I had this expectation that as I advanced the throttle every single bolts and rivet would flash through my mind. That did not happen, instead I actually relaxed a bit and tried to enjoy the ride. Concentrate on the signals the engine is giving you, keep down the middle and wait for the bird to leap.
At this point the closest aviation experience I’ve had was my first solo… that combination of a familiar plane climbing unfamiliarly fast paired with “now I have to land this by myself”. By 1000’ that was out of my mind. At 3000’ I was getting a little bored of turning left and climbing.
Then another strange thing happened. Tom was trying really hard to stay out of view and the 701 was doing a really good job of running away from my poor 150. Looking down and seeing my 150 more than 1000’ feet below trying really hard to keep up was very strange. Then during some of the turns I caught sight of it again through the big door windows, but much closer. It was something like watching the race scene from “Iron Eagle”. There was this little white plane with a red stripe turning so beautifully against the mountains and clouds. The 701 also slows down MUCH faster than a 150 and Tom went darting past me whenever I cut the throttle back.
The turns to the left and to the right were no big deal. I really had to restrain myself from going more than standard rate.
The 701 does not have a centering spring in the rudder or pedals. In addition it uses an all flying rudder with wetted area ahead of the hinge. If you push left rudder, it stays left rudder until you push it back. This is hard to remember. You also really need to lead your turns with rudder first, which is also hard to remember to do after so many years in a 150 where generally you use rudder and ailerons at the same time. Every once and I while I would see I was un-coordinated and push the rudder causing a bit of a skid.
When coordinated the 701 turns VERY tight. It is reasonable to fly the pattern only ¼ mile out, do a standard rate turn and expect to lined up for final. Hitting the rudder to get coordinated would skid you into coordination and really remind you of this.
The practice approaches were really nothing special and I have nothing more to say about them.
Landing was the ugly part. I knew I had tons of runway to allow myself to settle in. I knew I needed to carry power into the landing. I knew I had to hold the flare until last minute. These things blanked on me until I had already started to flare and felt that sinking feeling that makes every pilot think they will have to bend the gear back into shape. So of course I added power, but a little too much and got back up to where I started. Letting power out that time gave me a better sink rate but it was still a firm landing. Then I had the steering\rudder stiffness to contend with.
My thought is that the landing may have loaded the bungee strut putting more pressure on the front contact area, making the stiffness worse. Maybe stick back pressure would have helped.
All said and done the first flight took about 25 minutes and it seemed like 25 minutes. I didn't not any sense of time dilation or contraction. I remembered to breath and did some instrument scans. I was only tense for a few moments, most of which occured during the landing.
Thanks again to everyone who has helped, voiced support, stopped by my hangar, ect.
 N701GV had its first flight around 5:30PM on Wednesday 7/20.
I flew my Cessna 150 up from BFI to to AWO and met Tom Staggs. He then took my C150 and flew chase.
The engine in N701GV is a 912ULS producing 100HP at 5800RPM. The prop is a three bladed Warp Drive High Power pitched to 11.5 degrees. Static run up RPM is 5500. It currently DOES NOT have strut fairings or tail VGs. Empty weight is 626lbs.
Everything went as well as could be hoped. John Adams will get his helmet and parachute back un-used. There are a few items that I will fix before the next flight.
The objectives of the test were met and all steps of the first flight's test plan were completed.
Overall N701GV behaved very well and displayed no bad in-flight control characteristics. The flight controls felt balanced and no wings felt "heavy". The rudders were stiff in flight making fine corrections hard,
The flight test was pretty simple. I slowly advance to full throttle and then let the plane jump off the run way. At about 300' above ground I offset with the runway under my left. At 1000' above ground the plane was climbing so fast there was still runway ahead.
I then started a gentle left, climbing turn to keep in a cone of safety that would allow me to glide back to the runway in case of engine failure leveling off at 3000'
With that done I then evaluated basic left and right turns up to 15 degrees of bank and a descent. The descent proceeded into a simulated approach and a go-around.
This was repeated again descending down to 1000' above ground. One more practice approach was made to only 50' above the runway climbing back to 1200'.
Finally a full landing was made. It was not my best landing. I started the flare too high and came in a little hard to the left of center and barely was able to overcome the rudder friction to stay on the runway. Control friction was probably the largest factor, but loading of the nose strut may have also played a role.
I pulled the cowling and all inspection plates\hatches. No leaks were found and all bolts remained tight with Torque-Seal markings intact.
Several issues were found that need to be resolved before the next flight.
Bug#1 - The control tension for the rudders made for a stiff control system. This made fine tuned flight corrections hard and presented a challenge after touchdown for remaining in the center of the runway.
Bug#2 - The Garmin 496 GPS draws some amount of electricity from the main battery all the time. This keeps the GPS internal backup battery charged, but also reduces the available cranking amperage for starting. I will install a disconnect switch to cut the charging mechanism to allow for long term storage.
Bug#3 - The passenger side door displayed puckering during high power settings. An additional aft locking pin slaved to the main door latch will be installed.
Tom was kind enough to grab a pic while I was flying. I also took a portrait of N701GV yesterday after the DAR visit.
The flight back to BFI was pretty boring.
Tuesday, July 19, 2011
 The friendly regional DAR stopped by on Tuesday morning.
Overall it was a pretty easy experience. A fellow 701 builder, Curt Thompson, was there to observe the process and see what the DAR would look for in a 701. He also wanted to avoid any mistakes I had made.
The appointment was for 10AM and the plane was mostly already opened up, IE all access hatches, inspection plates, ect. Only the top cowling had not yet been removed.
I had a table setup with all the paperwork in order.
The basic safety inspection started at the nose, moved back to the cabin, to the pilot side wing, control access hatch, the empennage, passenger wing and finally back in the cabin.
Generally he checked that cables and wires were properly secured, gas and electrical separates, bolts were tight and proper length, ect. He also checked control continuity and correctness for the engine, flaperons, elevator, elevator trim and rudder.
Placcards were also checked.
As always what you worry the most about never receives attention. I spent a long time worrying about details like the registration numbering. The FAA has very strict guidelines concerning the spacing of the numbers. He just looked up and made sure it was there.
Then there were things that I was sure he would think were wrong, but are by plans. The prime example are the control surface hinge bolts. The Zenith design uses a bearing surface squished between two bolts, no cotter pin. I have spent so much time explaining that the bolts are never under rotation that I had bookmarked the plans page. He had just done a 750 so it never came up although he did check the bolts.
Of course he found some minor issues, but nothing that would block an airworthiness certificate. I was able to address his punch list within a few hours.
After a break and a lunch I reinstalled all inspection plates and the cowling. That was then followed by a complete walk through taken from my POH for both pre-flight and 1 month inspection routines.
I had not touched the plane for a few weeks so the combination of running electrical for the inspection and the Garmin GPS trickling a small charge gave me a hard start.
Runup went well and I took my time doing it to charge the battery. I taxied the plane onto AWO 34 and performed a few taxi tests. Everything went smoothly, but I really didn’t do much. Airspeed comes alive on the Dynon at ~25MPH just as the nose wheel gets light.
I decided to trim the wing root covering some more to help reveal the forward wing-root cover bolts. I also found a few bolts without torque-seal.Wednesday, July 06, 2011
 Finished major construction, ready for the DAR.
Added trim to wing root skins. Secured strobe\nav wires in baggage compartment.
Added tangs to rudder cables to effectively lengthen them. Neutralized rudder and brake pedals. Safety wire and secured rudder turnbuckles. Added cotter pins to all steering assemblies.
Added adele clamps to secure brake lines.
Finished securing wires in hatch.
Fitted scat tubing to oil cooler and re-bonded NACA duct.
Chased down a squeak in the elevator.
Final check for all bolts, pins, wire.
Found prop serial number ( without having to disassemble! )
Did static runup to verify full power and prop pitch. 5500RPM at 11.5 degrees pitch.
Wrote "Fuel On" \ "Fuel Off" placards on floor since stickers would not stick.
Performed fuel flow test at nose high attitude.
Punch List:
FINISH PROCEDURES\MANUAL
Emergency flight refresher ( simulated engine out, ect )
Trim passenger side door fiberglass, add rubber trim.
Fabricate, install streamlined strut covers. ( post first-flight )
VGs on elevator ( after initial test flights )
Sunday, July 03, 2011
Made a fork and then riveted in a small bracket to help keep the fire extinguisher from coming loose.
Drilled and deburred wing root covers to final A4 size.
Neutralized and set flaperon controls. Re-set aileron bump stops. Setting the ailerons is tricky, made worse when alone. First it is hard to determine the true up-right neutral position of the stick. Then you have to verify the lower torque tube bellcrank is in alignment ( not that much could be done about it now... ).
Finally it is a long slow process of measuring reference lines from the wing for gap distance. One trick I realized was to measure the angle between the rivet line for the push rod covers against the extrusion the connects the flaperon to the pushrod.
Luckily I had left the inboard pushrods coming from the torque tube long. This gave me more choices on setting the amount of reflex or deployment for a flaps up position.
The pushrods and jam-nuts are not flight ready.
The aileron bump stops are not the best designed items. Their placement is some what arbitrary and can be hard to align properly.
Using the darkness I verified the landing lights are aimed correctly.
On Tuesday the final securing of wires will be done. The steering push-rods will also get set.
Punch List:
FINISH PROCEDURES\MANUAL
Shorten steering pushrods, install plates to lengthen rudder cable.
Fuel flow test
Final securing of wires aft of seats in luggage
More cotter pins & safety wire ( flaperon pushrods & steering pushrods )
Safety wire turnbuckles on rudder cables.
Install wing root fairings ( post inspection )
fabricate, install streamlined strut covers. ( post first-flight )
VGs on elevator ( after initial test flights )
Saturday, July 02, 2011
Debugged transponder issue. I suspect it may have been caused by the GPS input on pin 2. Setting the Dynon to 29.92 matched the pressure altitude shown on the Garmin 327. Turning off the Dynon blanked the pressure altitude reading.
The manual indicates ( in very small print ) that NMEA inputs are not supported from the 396\496. Therefore I pulled the #2 pin to remove the input. This may have been a grounding issue caused by the GPS input or a software issue caused by the transponder attempting to decode bad input.
Found that taxing had loosened a bolt holding the passenger side nav light. Drilled out wing tip and tightened. Tips held by screws would be best, but may be impossible.
Punch List:
FINISH PROCEDURES\MANUAL
nuetralize aileron rods & control
Shorten steering pushrods, instal plates to lengthen rudder cable.
Final securing of wires aft of seats in luggage
More cotter pins & safety wire ( flaperon pushrods & steering pushrods )
Safety wire turnbuckles on rudder cables.
Install wing root fairings ( post inspection )
fabricate, install streamlined strut covers. ( post first-flight )
VGs on elevator ( after initial test flights )
Friday, July 01, 2011
Added reinforcements to the radio stack. Tightened and flight readied all nut plates related to the radio stack.
Adjusted aim of landing lights.
Installed nutplates and cover for elevator trim motor.
Punch List:
Fabricate wire bundle supports for rear cargo area.
Have transponder tested by avionics shop
FINISH PROCEDURES\MANUAL
VGs on elevator
nuetralize aileron rods & control
Shorten steering pushrods, instal plates to lengthen rudder cable.
Final securing of wires aft of seats in luggage
More cotter pins & safety wire
Safety wire turnbuckles in "double wrap" style
fabricate, install streamlined strut covers. ( post first-flight )
Monday, June 27, 2011
Lost the elevator trim servo cover ( held on by clecos ) during a runup test.
Torqued more bolts to final, riveted flaperon covers into place. Touched up primer on a few steel parts.
Fixed tachometer reading on Dynon. Tied down more wire bundles.
Punch List:
Fabricate wire bundle supports for rear cargo area.
Fabricate new elevator servo cover.
Have transponder tested by avionics shop
FINISH PROCEDURES\MANUAL
VGs on elevator
nuetralize aileron rods & control
Shorten steering pushrods, instal plates to lengthen rudder cable.
Final securing of wires aft of seats in luggage
More cotter pins & safety wire
Safety wire turnbuckles in "double wrap" style
fabricate, install streamlined strut covers. ( post first-flight )
Sunday, June 26, 2011
Finalized rudder bolts.
Bolted battery into position.
Installed dataplate.
Greased all bushings, control bolts.
Aimed landing lights.
Punch List:
Tighten passenger door ( opened during run-up )
Have transponder tested by avionics shop
FINISH PROCEDURES\MANUAL
VGs on elevator
nuetralize aileron rods & control
Shorten steering pushrods, instal plates to lengthen rudder cable.
Final securing of wires after of seats in luggage
More cotter pins & safety wire
Safety wire turnbuckles in "double wrap" style
fabricate, install streamlined strut covers. ( post first-flight )
Correct tach reading on Dynon, reconnect hobbs meter.
Saturday, June 18, 2011

Re-weighed the plane.
Nose: 162lb, arm=670mm
Left main: 232, arm= = 690mm
Right main: 232, arm = 670mm
Added RTV seal & trim around fuel neck filler & wing skin. Tightened a few more bolts & added cotter pins to all but two steering & rudder nuts. Added fuel type markings.
Tightened bolts between steering push rods and nose strut along with jam nuts.
Found fuel senders were "double grounded" and pins were crossed. Fixed fuel sender wiring. Flushed fuel system and calibrated Dynon fuel sensors.
Bled brake lines.
Charged battery.
Started engine from fuel in wing tanks.
Taxied under own power across the airport. Started break-in procedure for Matco brakes. Verified steering and brakes.
Punch List:
FINISH PROCEDURES\MANUAL
Final placement of battery
Install EAB plaque
VGs on elevator
nuetralize aileron rods & control
Final securing of wires after of seats in luggage
More cotter pins & safety wire
Safety wire turnbuckles in "double wrap" style
fabricate, install streamlined strut covers. ( post first-flight )
Install steering boots
Install nylon strip in service hatch to protect against elevator cable rub
Remove elevator & grind down clearance of center hinge.
Correct tach reading on Dynon, reconnect hobbs meter.
Aim, secure landing lights
Wednesday, June 15, 2011
Ordered some nylon to mitigate rubbing of the elevator cable on the baggage compartment.
Gave the EAB plaque to the engraver. Worked on procedures and manual.
Took an initial weight measurement of 621 pounds.
Punch List:
FINISH PROCEDURES\MANUAL
W&B
Final placement of battery ( pending W&B )
Install EAB plaque
Fuel Filler Marking for 10G 92MoGas\100LL w/TCP
Post registration in cabin
bleed brake lines
VGs on elevator
nuetralize aileron rods & control
Fuel tank calibration
Final securing of wires after of seats in luggage
More cotter pins & safety wire
Safety wire turnbuckles in "double wrap" style
Torque seal push rod jam nuts.
fabricate, install streamlined strut covers. ( post first-flight )
Install steering boots
Install nylon strip in service hatch to protect against elevator cable rub
Wednesday, June 08, 2011

Finished transition training. Adjusted elevator tension bungee. Trimmed wingroot covers, ready for rivetting once fuel system is fully tested. Installed fire extinguisher. Added extra nutplates for cowling. Epoxied NACA inlet adapter for oilcooler. Fitted washers for bellcranks. Created steering boots.
Trimmed, primed and installed dorsal fins. Bunch of small stuff.
Punch List:
FINISH PROCEDURES\MANUAL
W&B
Final placement of battery ( pending W&B )
Engrave & install EAB plaque
Fuel Filler Marking for 10G 92MoGas\100LL w/TCP
Post registration in cabin
bleed brake lines
VGs on elevator
nuetralize aileron rods & control
Fuel tank calibration
Final securing of wires after of seats in luggage
More cotter pins & safety wire
Safety wire turnbuckles in "double wrap" style
Torque seal push rod jam nuts.
fabricate, install streamlined strut covers. ( post first-flight )
Install steering boots
Install nylon strip in service hatch to protect against elevator cable rub
Sunday, May 22, 2011
Punch List:
Got a ton of stuff done this weekend:
Fabricated and installed the oil door, installed a few cotter pins, removed the elevator trim and modified the hinge to accept safety wire, installed the elevator tensioning bungee, re-installed the doors, fabricated access panels into the seat pans, installed the access panels and re-installed the seat pans.
Punch List:
FINISH TRANSITION TRAINING
FINISH PROCEDURES\MANUAL
install wingroot covers.
W&B
Final placement of battery ( pending W&B )
Engrave & install EAB plaque
Fuel Filler Marking for 10G 92MoGas\100LL w/TCP
Post registration in cabin
mark "EXPERIMENTAL" on entry way
bleed brake lines
VGs on elevator
nuetralize aileron rods & control
Fuel tank calibration
Final securing of wires after of seats in luggage
install first-aid kit and fire extinguisher
Washers for aileron bellcranks
Nose gear pushrod boots
Install dorsal fin
Two additional cowl fasteners
More cotter pins & safety wire
Safety wire turnbuckles in "double wrap" style
Torque seal push rod jam nuts.
fabricate, install streamlined strut covers. ( post first-flight )
finish priming bare surfaces.
Sunday, May 15, 2011
 Got a ton of stuff done this weekend:
Fabricated and installed the oil door, installed a few cotter pins, removed the elevator trim and modified the hinge to accept safety wire, installed the elevator tensioning bungee, re-installed the doors, fabricated access panels into the seat pans, installed the access panels and re-installed the seat pans.
Punch List:
FINISH TRANSITION TRAINING
FINISH PROCEDURES\MANUAL
install wingroot covers.
W&B
Final placement of battery ( pending W&B )
Engrave & install EAB plaque
bleed brake lines
VGs on elevator
Adjust control tension
nuetralize aileron rods & control
N-Number on panel
Fuel tank calibration
Re-fab spacer on passenger side aileron bellcrank
Re-fab diagonal pass side jury strut
Final securing of wires after of seats in luggage
install first-aid kit and fire extinguisher
Washers for aileron bellcranks
Grease on bellcranks
Nose gear pushrod boots
Install dorsal fin
Two additional cowl fasteners
More cotter pins & safety wire
fabricate, install streamlined strut covers.
finish priming bare surfaces.
Tuesday, March 01, 2011
I fabricated the flaperon bungee rention system, but am having problems reaching underneath the seat to install the bungee cord.
The new landing gear leaf is in. Hopefully it and the brake lines can be installed in a few weeks. Following that only the jury struts and dorsal fin will remain for installation.
Monday, February 21, 2011

Latest work:
Skylight and windshield all installed and unwrapped.
Interior painted and ready. Only a few more wires need to be secured in the cabin
Controls re-installed with continuity restored. All lingering clearence issues fixed.
Rudder pulleys and flaperon mixed riveted down
Sealant & RTV installed to prevent leaks
Punch List:
W&B
Final placement of battery ( pending W&B )
Engrave & install EAB plaque
Install new Grove gear
Brake lines
Cotter pin on bungee pin & outer sleave to tighten
Fabricate top bungee retaining pin
Drill cotter pin holes for elevator bellcrank, elevator retainer and flaperons
VGs on elevator
Adjust control tension
N-Number on rudder
N-Number on panel
Fuel tank calibration
Washers for aileron bellcranks
Tensioning bungee for elevator
Flap handle bungee
Spinner final install
Grease on bellcranks
Yellow plug succured on engine spray rail
Nose gear pushrod boots
Path door fiberglass
Install dorsal fin
Oil access door
Two additional cowl fasteners
Monday, January 31, 2011

Starting to apply finishing touches.
I uninstalled all the controls, cleaned and painted them. I cleaned out the cabin, vacuumed it and blew it out with air. Once that was done painting started.
The control stick was ground down for extra clearance .
Sound deadening material will be cut to be floor mats.
Saturday, January 29, 2011

Monday, January 17, 2011

Another weekend of finishing work.
Preperations are being made to button the dashboard onto the panel. I filled all the grommet holes in the firewall with high-temp RTV. I also fabricated patches to cover the holes where the Zenith style throttle linkages passed through the firewall. They also received RTV along with rivets.
A new panel light was installed to replace the one that was damaged while in storage.
Label the panel
Patch fiberglass on doors
Final windshield install + sealing
Seal sunroof
Order & install steering boots
Adjust control tensions
Check all cotter pins, saftey wire, bolts
Install elevator VGs
Install dorsal fin
Final upholstrey install
Install oil door.
Replace gear with Grove brakeline drilled gear ( ordered )
Run brake lines
Install jury struts
EAB plaque
Adjust nose strut
Final battery box secure
More transition training
Insurance
Smooth any remaining rough edges.
Thursday, January 13, 2011

The engine started without problem.
New punchlist:
Patch fiberglass on doors
Final windshield install + sealing
Seal sunroof
Order & install steering boots
Adjust control tensions
Check all cotter pins, saftey wire, bolts
Install elevator VGs
Install dorsal fin
Final upholstrey install
Install oil door.
Replace gear with Grove brakeline drilled gear
Replace landing gear pads
Run brake lines
Install jury struts
EAB plaque
Adjust nose strut
Install control boots for steering rods.